Sunday, December 11, 2011

Creative Tuesday - Ornaments

This week we are making ornaments for the holidays!  I have a big variety of ornaments to choose from, so I hope you'll join me!  You will find pictures and details below - if you plan on coming please make sure you have the supplies listed with each ornament you want to make.
***
Please bring scissors and adhesive (gluestick or tape runner will work - for the honeycomb ornament you will need mini gluedots).  You are welcome to bring your own paper, but I also have a huge supply of patterned papers and solid cardstock on hand to purchase for $0.75 per 12x12 sheet.  I have listed below how much paper is needed for each ornament.  I will also have accessories and embelishments available to purchase to put the finishing touches on your ornaments, but you are welcome to bring your own as well.  Ribbons, buttons, sparkles, glitter, etc.
***
Date: Tuesday, December  13th
Place: My house - contact me for directions
Time: I will open up shop at 10 a.m. and close at 3:30 p.m.
Come when you can, stay as long as you can, and make as many ornaments as you want! If you will be here for lunch, bring something to share and we will have a potluck lunch. I hope you can join me - contact me at jvdevries22@hotmail.com with any questions or to RSVP.
***
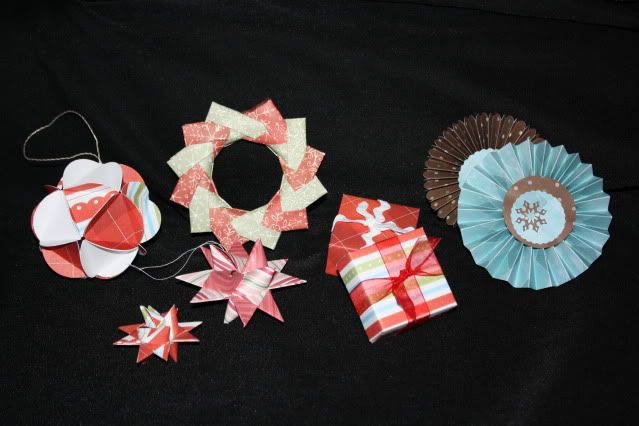
Here are some pictures of some of the different types of ornaments I can teach you to make - all from paper! 
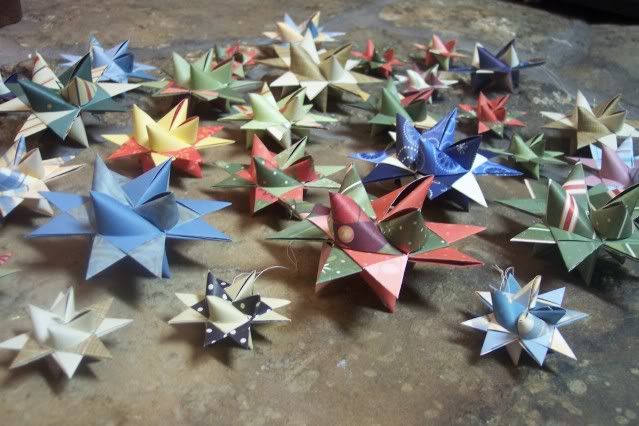
An old favorite - German Stars
You can create one star with less than 1/2 of a sheet of paper

A new favorite - Honeycomb (you will need a package of permanent mini glue dots for this ornament, it takes 126 for each ornament, and this one takes at least 2 sheets of lightweight 12x12 paper if you are bringing your own)
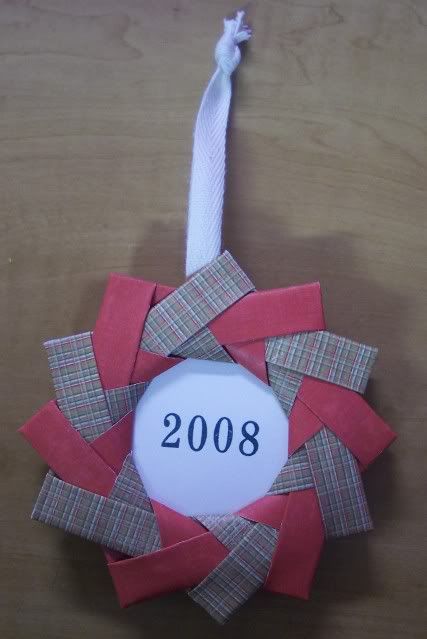
Wreaths
To create one wreath you will need one full 12x12 sheet of paper, or two 1/2 sheets of paper in two coordinating colors

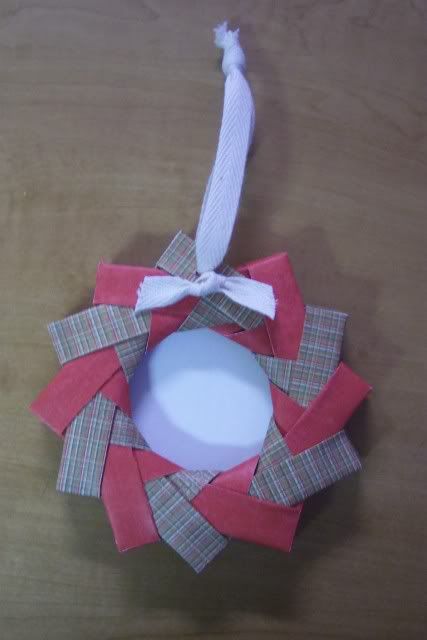
These are perfect for a picture on one side...

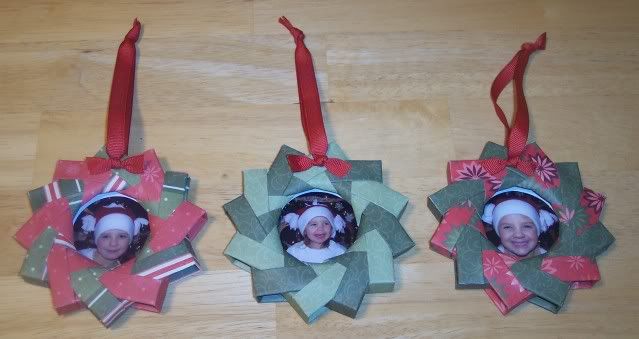
...and the year stamped on the other side.
3-D Balls and Boxes
Balls take about 1/2 sheet of cardstock and about 1/2 sheet of lightweight/patterned paper.
To create a 2 1/4" box you will need a 12x6 sheet of paper - any type will do.
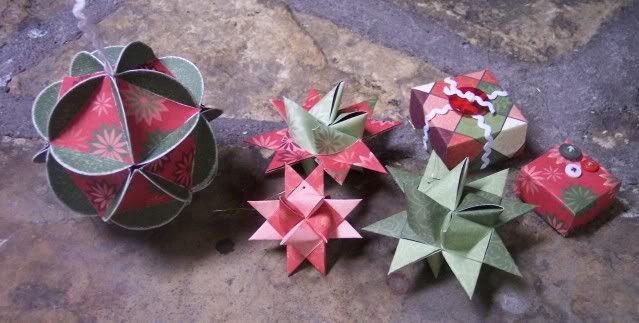
Old Christmas cards work well, too.
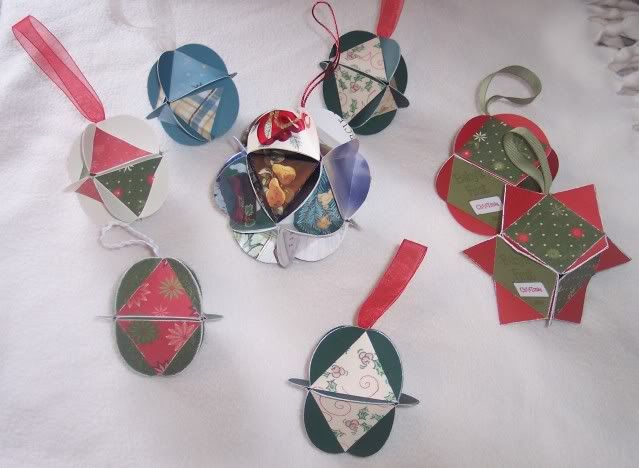
and YoYos (pictured on the right)
For a 4" YoYo you will need about 1/2 a sheet of paper - any type will do.

Sunday, December 4, 2011

Creative Tuesday - Name Frames

This week I have a fun project in store for you for Creative Tuesday.
Date: Tuesday, December 6th
Place: My house - contact me for directions
Time: I will open up shop at 10 a.m. and close at 3:30 p.m. If you are interested in an evening session, contact me for possible times
Please Bring: Your choice of frame - any size/shape will do.  Also bring scissors and your choice of adhesive.  You are welcome to bring your own paper, but I also have a large selection of patterned and solid paper and accessories that you can purchase to create your frame, and we will use my Cricut and/or stamps for the name.
***
Come when you can, stay as long as you can, and make as many name frames as you want! If you will be here for lunch, bring something to share and we will have a potluck lunch. I hope you can join me - contact me with any questions. Here are a few name frames that I have previously made.  These are great family gifts, wedding gifts, and new baby gifts.

Monday, November 28, 2011

Join me for Creative Tuesday!

This week I will have my stash of pre-cut cards for you to chose from for Creative Tuesday.

Date: Tuesday, November 29th
Cost: $1 per card (with an envelope) or $0.50 per card (without an envelope)
Place: My house - contact me for directions
Time:  I will open up shop at 10 a.m. and close at 3:30 p.m. If you are interested in an evening session, contact me for possible times
Please Bring: Scissors and your choice of adhesive

Come when you can, stay as long as you can, and make as many cards as you want - it can be 1 or 100!  If you will be here for lunch, bring something to share and we will have a potluck lunch.  I hope you can join me - contact me with any questions.  Here is a small sample of some of the cards I have pre-cut and ready to put together!

Tuesday, November 15, 2011

CTMH Spotlight Blog Hop - Embossing

Hello and welcome to this month's CTMH Spotlight Blog Hop!  This month we are featuring projects using an Embossing Technique.  If you came from Luisa's blog then you are on the right track!  If you are starting here, then just keep hopping along to check out what everyone else has created.
***
I love embossing, whether it's heat embossing or dry embossing, it's always a fun addition to any project.  Click HERE to view all items available from Close To My Heart to meet your embossing needs.  Today I am featuring some projects using heat embossing.
***
I gave a little sneak peek last week, here are a few of the full pages.  I created these pages for a friend's baby shower.  She only scraps in 8 1/2 x 11 so I had to challenge myself since I've never scrapped this size before.  On these following pages, I heat embossed on a clear transparency to create my own type of overlay.
For these Halloween pages I modified the Dialogue pattern from Imagine.  I also used some retired Enchanted papers and Creepy Cobwebs stamp set.  I heat embossed the title and the spider on the right page directly on the white paper.  I heat embossed the spider web on the transparency and trimmed around it.  I attached it with carefully placed dots of Liquid Glass (to hide under the image) and a few coordinating brads.
For the following 4th of July pages I modified the Levitate pattern from Magic.  I used some retired Blue Ribbon paper, along with a Stamp of the Month from this summer, American Celebration, and an old favorite stamp set, Circle Around.
I embossed the firecrackers on the transparency and added a touch of Prisma Glitter to the image while the embossing powder was still hot.  It added just a touch of sparkle.  Like the spider web, I trimmed around the image and attached it to the page using Liquid Glass behind the stars and a few dots.
I added a few Bling Buttons as well - this one covers up the glue dot that I used to hold the transparency down.
Here are some pages for Baby's First Christmas with a few different embossing touches added.  I modified the Full House pattern from Imagine.  I used the retired Jingle papers on these pages.  My title was cut using the Cricut Art Philosophy Collection.
I used white embossing powder mixed with Prisma Glitter to color this Dimensional Element Ornament.  It adds just the perfect touch of sparkle and shine.

Another thing I like to do with Embossing Powder is color brads with it.  I took some plain white brads here - heated the brads with a heat gun then dipped them in Baby Pink powder and heated them again.

For some regular embossing, I did a little bit of that here on the Blessing Day pages.  To create these pages I modified the Simple Contrast pattern from Cherish.  I used the retired Silhouette papers.  The title was cut using my Cricut Art Philosophy Collection - with a little help from my Cricut Design Studio I was able to change the look of the alphabet by making it taller and skinnier.  I do NOT use my Cricut without the Design Studio anymore - I know exactly what I am cutting and get the exact size I want without guessing, plus I am able to use my paper better and really customize the look.
I embossed the word DAY on these black banner pieces (also cut using the Cricut) using white embossing powder and Felicity stamp set.
A few more close-ups from these pages just because I love them so much ;-)  Here's a cluster of crochet flowers attached with various sizes of black brads.
The journaling piece was stamped using lines from the Comments stamp set and accented using the Cherish the Moment stamp set.
Thanks for stopping by - to continue along the hop, your next stop is Nikka!

Monday, November 14, 2011

Progress & Changes - Upstairs Bathroom

A while ago I posted the transformation that our Master Bedroom has taken over the last year.  Today I am going to share another room - this time it's our upstairs bathroom.
Here it is when we bought the house - I don't know what was up with the mirrors in both bathrooms, but we knew it was an easy fix.

Here it is after we got done with it.  I've wanted blue walls in the bathroom ever since we made over our bathroom in our last house, but I was worried about making it feel too dark.  This bathroom has a skylight and a window so I knew it wouldn't be a problem.
We put new toilets in both bathrooms  - since we were now hauling our own water, we wanted water efficient ones that would actually flush.  Here is a little flashback of T-dawg - he loved that he could reach these light switches just by climbing on the toilet, and didn't have to find a chair or stool to assist him.
This is our little 'mud room' - to the right of this is the door that goes out to the garage, so I've loved this little nook.
We didn't do much to this area - just a fresh paint job and then added some mirrors with coat hooks.  This is where the kids hang their backpacks and kick off their shoes.  There is also a closet here just opposite the nook where we keep the vacuum, towels, batteries, and lots of other stuff!
Thanks for looking - stay tuned to see the rest of our changes!

Thursday, November 10, 2011

A little peek...

...at a fun little project I've been working on lately...stay tuned to see it all!

Tuesday, November 1, 2011

Halloween...continued.

Here are some pics from the wrap-up of our Halloween festivities.  We had school parties and then Trunk-or-Treating at the church.
Here are all of the munchkins. 
Kaylee had this pioneer dress that her cousin passed down to her that my SIL made - she loves it and has been begging me to wear it.  I said no for school picture day, no for church, but I was more than happy to let her wear it for Halloween!  The bonnet is one that my mom made for me a few years ago.
Brianna picked Cleopatra this year - our first ever store bought costume!  And she actually let me put make-up on her!
The biggest reason I dislike buying costumes is because you never know who else is going to have the exact same one.  There were 4 people at the school with this exact costume, but Bree didn't mind matching Jenny!
My Tool Man used his Tonka Truck as his treat bucket - he eventually ditched the pumpkin.
I finally got pics of the little ones with their pumpkins.  Here is my little owl with her owl pumpkin.  We saw this idea HERE.  Her eyes didn't quite survive the trip in the car - Daddy was driving ;-)
We love these pumpkin head pieces - Trysten had fun picking his pieces but needed help pushing them in, this was one tough pumpkin!
After the Trunk-or-Treat we also took them on a quick loop through one neighborhood to do some Trick-or-Treating.  They were so excited.  Brailee and Trysten got tired and their buckets got too heavy so they went back to the Yukon with Daddy, but Kaylee and Brianna were so excited they could have gone all night.  They kept saying, "Thank you!" for taking them.  Hope you enjoyed your Halloween.  I can't believe it's November already, now I need to get ready for Kaylee's birthday.  It's been snowing all day here today, but at least we had great weather yesterday!

Thanks for stopping by!

Monday, October 31, 2011

Happy Halloween!

Thursday was the start of the Halloween Festivities for us and the fun continues through tonight.  We started with the Story Time party at the Library.  It really snuck up on me this year and I forgot that we were supposed to take treats to share until the night before at bedtime.  So Brailee and I browsed through some past Halloween issues of Family Fun and found something that would work with what we had on hand.  She picked these Skeleton cupcakes so the next morning when we woke up we got to work baking and decorating.  I didn't have a good selection of cupcake wrappers on hand, and most of them had been smooshed together, so they were mis-shaped.  I tried to straighten them out but it didn't work so I baked them as-is and it ended up being a happy mistake.  After I took one batch out of the oven, I looked at it just right and noticed that it was shaped like a skull.  I actually liked them better than our original cupcake plan!  I added M&M's for the eyes, a chocolate chip for the nose and used decorator gel for the mouth.

Here's my little owl on the way to the party - bet you've never seen a pink and striped owl before ;-)  Everyone thought she was cute, but nobody knew what she was - but she loves it, so I'm happy!

And my little handyman.

That night we started out at the town activities - which began with a costume contest.  I didn't get a pic of the older girls in their costumes but I will have plenty of chances today.  By the time the contest FINALLY got over, the kids were cold and hungry, and it was almost bedtime so we headed home for dinner.  We missed the costume parade and trick-or-treating to all of the businesses and their activities, but oh, well!  Then Saturday we took the kids to a Haunted House put on by the Young Men and Young Women from our ward - the kids had been BEGGING to go to a haunted house so we chose that one this year.  Today all of the kids have their school parties and then tonight is Trunk-or-Treating at the church, and that will probably be it for this year!  I am so glad I had all of the costumes done well in advance this year, it's been fun to relax and enjoy the activities. 

Yesterday we decorated and carved pumpkins...
I didn't get pics of the two little ones and their pumpkins, I'll have to do that tonight, but here are the big girls.

...and made eyeballs and bones.

We found this fun idea online for Halloween Treat Bags and Boxes and couldn't wait to try some out!  Using the Cricut Art Philosophy cartridge from Close To My Heart, I cut everything we needed to create the fun bat boxes, including the Chinese take-out box.  I used the holly leaves to create the bat wings, the holly berries to cut various circles for the eyes, the circle band (cut into thirds) to create the mouth.   The only thing I didn't cut from the cartridge were the teeth - those were freehanded from scraps.  Here's my little crafter gluing them together this morning.  These were for the preschool kiddos.

Here's the final results - aren't these the cutest little bats you've ever seen?  I especially love the fangs that are pointing up ;-)  One of them ended up being a spider because I either lost or failed to cut one pair of wings and it was just easier to turn it into a spider.

Today I am making banana bread, and if I get a chance, some Dracula Dentures!  If you're looking for some more last minute creepy cupcakes here are some more fun ones I found - click here!