Showing posts with label Blog Hop. Show all posts

Thursday, March 15, 2012

My Creations Spotlight Blog Hop

I am so happy to be participating in another blog hop - it's been a while!  This month for our Spotlight Blog Hop we are featuring the My Creations 3-D products from Close To My Heart.  Be sure to check out all the inspiration by hopping around to see what everyone created.  If you came here from Haley's blog, you're on the right track!
***
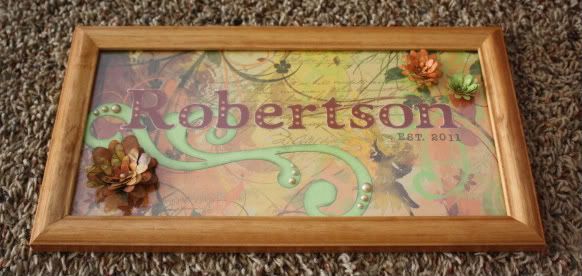
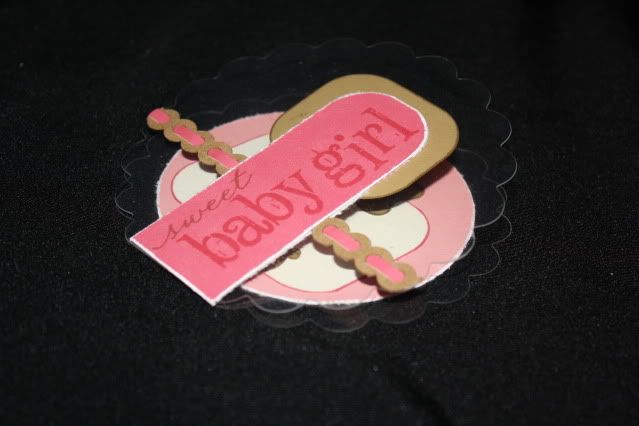
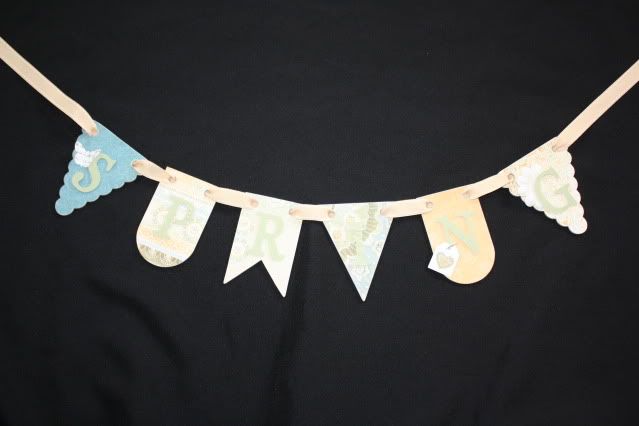
I decided to play with the new My Creations® Mini Banner - it was the first thing that I ordered out of the newest Idea Book and I hadn't done anything with it yet, so it was just the motivation I needed!  We recently got out our Spring/Easter decor and realized I really don't have a lot of stuff so I wanted to add to my collection and decided a 'SPRING' banner would be fun and something new.  The best part is, I still have banner pieces left so I'm not done playing with this product yet - may just have to order a few more when I'm done with this one!
***
Anyway, on to my project...I am not much of a pastel girl so I broke away from the traditional Easter/Spring colors and used the new Florentine papers for my banner - I had (3) 6"x6" sampler pieces of paper from this pack so I was able to use each pattern.  I used the Cricut® Art Philosophy Collection to cut my letters from Garden Green Cardstock - love my Cricut and this cartridge rarely leaves my machine!  Another handy tool I used on this project were my Finishing Files - so handy and I love the look they helped me achieve!
If you are ready to continue along the hop, the next stop is Adeline.  If you would like to check out more of my project, keep reading - but don't forget to see what the rest of the gals in the hop have created! 
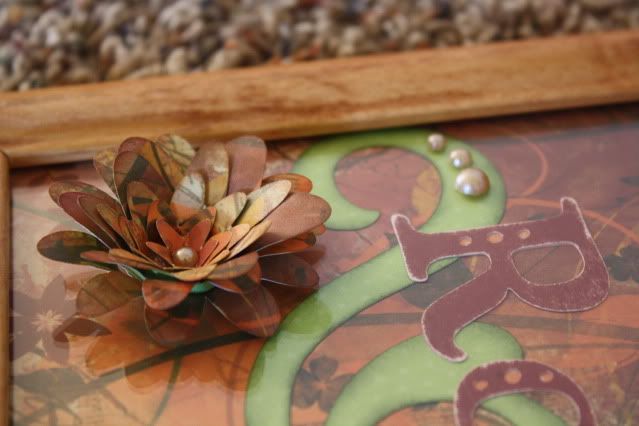
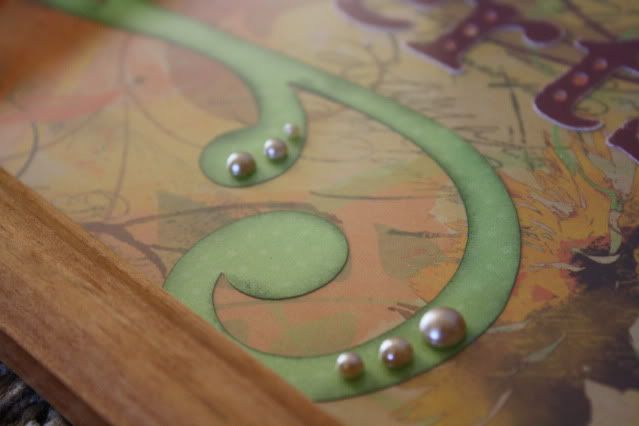
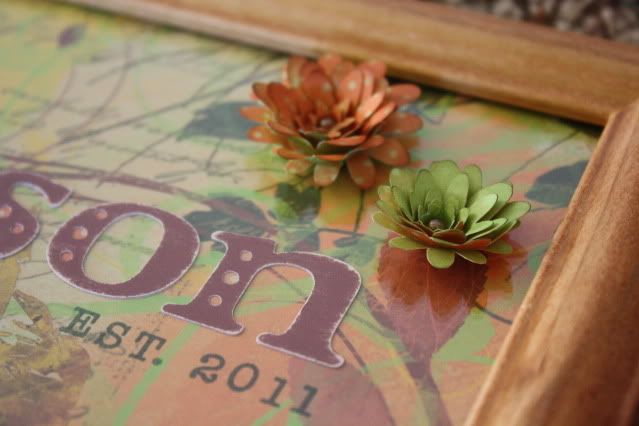
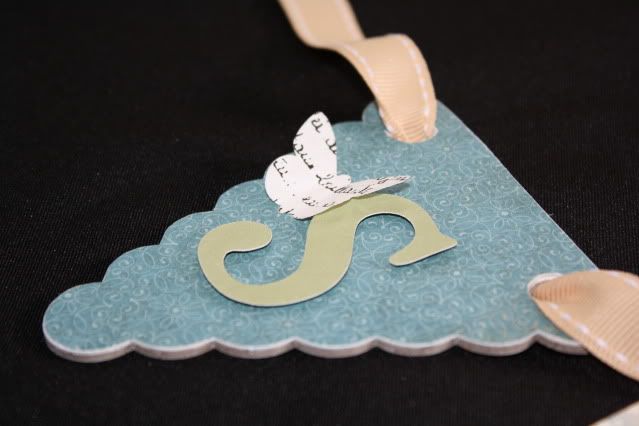
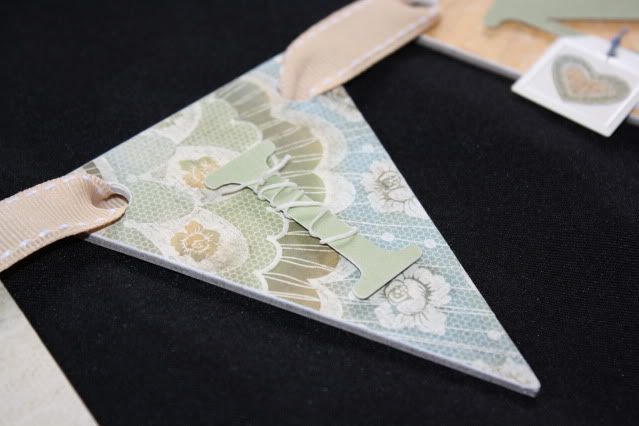
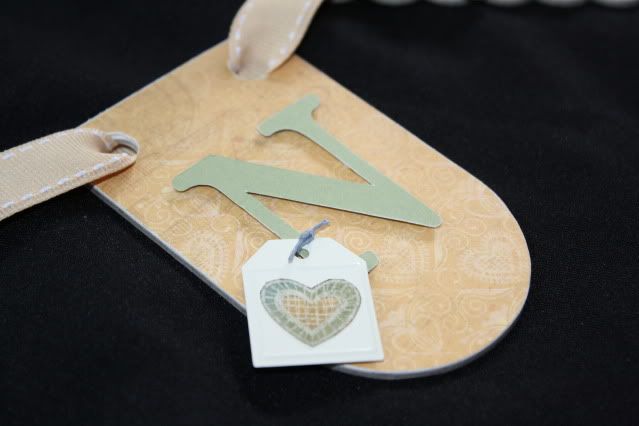
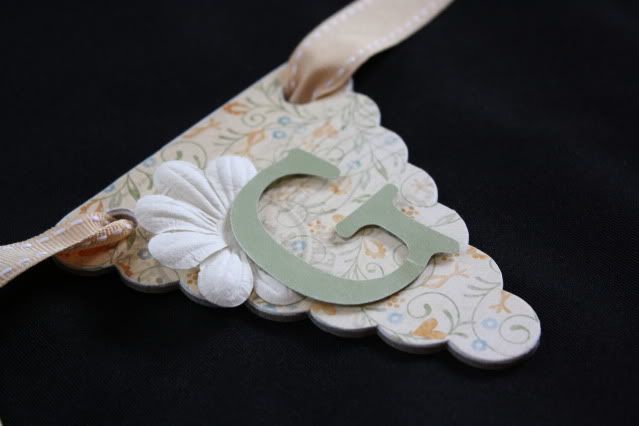
Here is a close-up of each letter so you can see the minor details and the gorgeous papers.
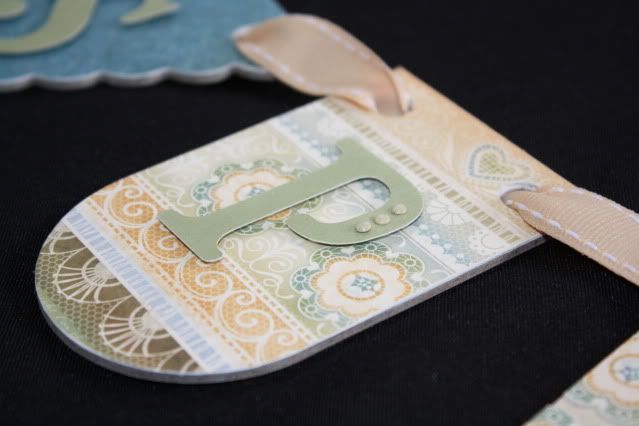
R - used paper pieces that I cut out from some scraps.
I - this paper has so much pattern that the letter 'I' almost gets lost - I tried to make it stand out by simply wrapping it in Colonial White Waxy Flax - I could have used a different color of cardstock to help this letter stand out more, but I wanted to keep all of the letters the same color.
N - used a bit of Indian Corn Blue Waxy Flax to tie on a metal tag from the Colonial White Mini Medleys - the heart was cut from another scrap of patterned paper from Florentine.  I just realized I was planning on covering the heart in Liquid Glass but forgot - I'll have to add that.
G - a simple Just Blooms flower folded and tucked under the letter.

I have been attempting to hang this banner on the mirror above my piano (using removable glue dots) but so far am not having any luck.  Any suggestions on getting it to stay without leaving holes or marks?
***
Thanks for stopping by - don't forget to continue along the hop by checking out the next super talented lady, Adeline!

Tuesday, November 15, 2011

CTMH Spotlight Blog Hop - Embossing

Hello and welcome to this month's CTMH Spotlight Blog Hop!  This month we are featuring projects using an Embossing Technique.  If you came from Luisa's blog then you are on the right track!  If you are starting here, then just keep hopping along to check out what everyone else has created.
***
I love embossing, whether it's heat embossing or dry embossing, it's always a fun addition to any project.  Click HERE to view all items available from Close To My Heart to meet your embossing needs.  Today I am featuring some projects using heat embossing.
***
I gave a little sneak peek last week, here are a few of the full pages.  I created these pages for a friend's baby shower.  She only scraps in 8 1/2 x 11 so I had to challenge myself since I've never scrapped this size before.  On these following pages, I heat embossed on a clear transparency to create my own type of overlay.
For these Halloween pages I modified the Dialogue pattern from Imagine.  I also used some retired Enchanted papers and Creepy Cobwebs stamp set.  I heat embossed the title and the spider on the right page directly on the white paper.  I heat embossed the spider web on the transparency and trimmed around it.  I attached it with carefully placed dots of Liquid Glass (to hide under the image) and a few coordinating brads.
For the following 4th of July pages I modified the Levitate pattern from Magic.  I used some retired Blue Ribbon paper, along with a Stamp of the Month from this summer, American Celebration, and an old favorite stamp set, Circle Around.
I embossed the firecrackers on the transparency and added a touch of Prisma Glitter to the image while the embossing powder was still hot.  It added just a touch of sparkle.  Like the spider web, I trimmed around the image and attached it to the page using Liquid Glass behind the stars and a few dots.
I added a few Bling Buttons as well - this one covers up the glue dot that I used to hold the transparency down.
Here are some pages for Baby's First Christmas with a few different embossing touches added.  I modified the Full House pattern from Imagine.  I used the retired Jingle papers on these pages.  My title was cut using the Cricut Art Philosophy Collection.
I used white embossing powder mixed with Prisma Glitter to color this Dimensional Element Ornament.  It adds just the perfect touch of sparkle and shine.

Another thing I like to do with Embossing Powder is color brads with it.  I took some plain white brads here - heated the brads with a heat gun then dipped them in Baby Pink powder and heated them again.

For some regular embossing, I did a little bit of that here on the Blessing Day pages.  To create these pages I modified the Simple Contrast pattern from Cherish.  I used the retired Silhouette papers.  The title was cut using my Cricut Art Philosophy Collection - with a little help from my Cricut Design Studio I was able to change the look of the alphabet by making it taller and skinnier.  I do NOT use my Cricut without the Design Studio anymore - I know exactly what I am cutting and get the exact size I want without guessing, plus I am able to use my paper better and really customize the look.
I embossed the word DAY on these black banner pieces (also cut using the Cricut) using white embossing powder and Felicity stamp set.
A few more close-ups from these pages just because I love them so much ;-)  Here's a cluster of crochet flowers attached with various sizes of black brads.
The journaling piece was stamped using lines from the Comments stamp set and accented using the Cherish the Moment stamp set.
Thanks for stopping by - to continue along the hop, your next stop is Nikka!

Thursday, September 15, 2011

CTMH Spotlight Hop - Cricut Art Philosophy Collection

Welcome to this month's CTMH Spotlight Blog Hop.  We are featuring the new Cricut Art Philosophy Collection from Close To My Heart - you don't want to miss this!  If you came here from Lori's Blog, you're on the right track.  If you're starting here, just keep hopping along and you'll catch everyone's awesome creations!
***
As for me, I never thought I would ever own a Cricut - didn't think I would need one or even enjoy using it.  In fact, for Christmas a couple years ago David got me one, but I had also won a free Creatopia on Christmas Eve so I talked him into letting me take the Cricut back.  So this summer when Close To My Heart came out with their Cricut Art Philosophy Collection, I was interested.  After I started seeing everything you could create with just this one cartridge, I was sold.  Luckily it was my birthday last month so I knew exactly what to ask for ;-)  I am so glad I did - I have had so much fun with this cartridge and I have barely scratched the surface on what you can do with it.  Here are some of my favorite creations - there are a lot more floating around up in my head, and a lot that I want to recreate - hopefully I'll get more chances to play and share!

Something I have had fun creating are these drink pouches using the Door Hanger Pouch (cut at 9" or 9 1/2").  I made these ones for the attendees at my Crop 'Til You Drop event last month.  I was addicted to these spiral flowers before I got this cartridge - now that they are so much easier and there are 6 different styles of flowers, I am even more addicted!
Then I made these ones for the girls' teachers, the principal, and office ladies for the first day of school.  I wish I had come up with more things to put in the pouches, but it was such a last minute project (literally the morning they started school) so I didn't have time.
The first day the girls finally rode the bus we made a quick one for their bus driver.
Now it's time to hop over to Haley's Blog. 
I can't wait to see what everyone else has come up with using this versatile collection!

Here are a few other things I have created lately using this collection.
Here is a large jar I decorated for Primary (the children program at church) to remind them to R.E.D. -Read Every Day (their scriptures).  I used the Cricut for the scallop circle on the top, the pennants and letters, and the tag.

Here is a project that I've previously posted but it's a favorite - I plan on creating a few more of these!  The letters, flowers, and swirl were all created using this collection.
Thanks for looking!

Monday, August 15, 2011

CTMH Spotlight Hop - Circle Cards

Welcome to this month's Close To My Heart Spotlight Blog Hop! If you came here from Nikka's blog, you are on the right track. If you are starting here, then just keep hopping along to see all of the other creations.
***
This month we are featuring Circle Cards - I forgot how much I love circle cards, I really should make them more often!  I like using the Colonial White and White Daisy circle cards and envelopes - I love that they come with their own envelope, I always struggled finding the right size before.  I also love the Clear Cards, I need to play around with those some more!
First up I have a card that I made for a niece's first birthday.  This one was really simple, I just cut a Hollyhock ring, a Blush piece for the sentiment, stamped and cut the candle using the Candlelight stamp set and Sophia papers, and added a few pink buttons.  I will admit, I always like to thread my buttons before I put them on a project, they just seem naked without something.  This time I made myself leave them plain - not so bad, right?
Here is another circle card that I made a while ago but haven't posted yet.  I also used the Sophia papers but this time with the You're Sweet stamp set.  I used Liquid Glass on the orange.
I have more circle cards posted below, but if you are ready to continue along the Blog Hop, the next stop is Amie!
***
These cards have been posted before, but if you missed them and want more details, just click on the card title to go to the previous post and find out more!

Thanks for looking - don't forget to hop along to Amie's Blog!

Thursday, August 4, 2011

A little something new!

The newest Idea Book from Close To My Heart went live on August 1st - you can click HERE to view it online, or contact me to see how you can get your own free copy!  There are some fabulous new products, and I've had a chance to play with a few.  I am linking up to Tresa (from Fabulously Artsy) and her New Product Blog Hop - you must check out what everyone else has been creating with their new goodies!
As for me, I created a few cards for my upcoming Open House - everyone who comes will get to make one of the following cards for my free Make & Take.  All three of these cards use the Gallery pattern from Wishes, but by changing up the papers and stamps used and rotating the pattern, I get three completely different looks!
I used the new Art Philosophy Collection - CTMH has teamed up with Provo Craft and we now have our own exclusive Cricut cartridge!  This collection comes with a cartridge, 3 D-sized stamp sets (valued at $17.95 each), and 3 sets of Dimensional Elements.  I technically didn't use the cartridge yet as my machine (that I'm getting for my birthday this month) won't get here until Friday, but I hand cut what the machine would actually cut, just to get the idea.
This was the first card that I made - and it's my favorite.  I used the new Typeset papers (LOVE the new labeling strip at the top of each paper - I used the back for the alphabet border strip on this card), new Milepost Shapes, along with some older favorites, a Black Bitty Brad, Colonial White button tied with a bit of Black Waxy Flax, and Kraft Border.  I also used one of the images from the Art Philosophy stamp set called Tags.
This was the next card I created - I used the new Believe papers, a fun new Bling Button, and images from the Art Philosophy stamp set called Seasons.

The last card I created uses the new Wonderland papers.  I tried to use an image from the Art Philosophy Celebration stamp set, but I don't think the images got cut deep enough and I was having ink issues so I contacted CTMH and I am in the process of sending it in for a replacement.  I was carefully able to stamp the sentiment from that stamp set, but the flower came from the Seasons stamp set that I used on the last card.  I also used some Clear Sparkles and Spray Pen on this card.
I had fun playing with a few new goodies - I can't wait to get my Cricut and really play with the new cartridge - it looks like fun!
Thanks for visiting!

Friday, July 15, 2011

CTMH Spotlight Blog Hop - Color-Ready Kraft Borders

Welcome to this month's Close To My Heart Spotlight Blog Hop - I'm thrilled to get to play along again this month!  If you came here from Luisa's blog, you are on the right track.  If you are starting here, then just keep hopping along to see what all of the talented Consultants came up with.
***
This month we are featuring the fun Color-Ready Kraft Borders - let me tell you, great things come in small packages!  I was amazed when I first received my order of these, there are a ton of borders and the possibilities are endless!  Let me show you some of the things I have created recently using these borders - my favorite feature of these is that they come adhesive-backed, so they are perfect for adding to CLEAR projects, like I have done here...can anyone guess where I saved this case from?
It's the case from our iPod Touch - I knew I saved it for the perfect project!  I kept the front super simple, starting with the colors from the Wings Papers.  I just cut a border strip to the right size and applied it to the cover.  Then I embossed a heart from the retired February Word Puzzle stamp set using Vineyard Berry embossing powder.  I then colored some Irresistibles Lots of Dots letters using Juniper Ink and attached them to the front, handwrote the word 'notes' and attached some Opaques Pearls.
I will not share the inside pages yet, as it's a gift and needs to stay a surprise, but I used a lot more of the borders on those, too.  I love how this turned out!
I have more border projects posted below, but if you are ready to continue along the Blog Hop, the next stop is Haley!
Here is another project - this time using a Clear Card.
I weaved a 1/8" piece of Hollyhock CS through this border.  This card uses the Ricochet pattern from Wishes along with Hollyhock, Blush, Colonial White, and Desert Sand CS and the Sweet Baby stamp set.  Here is a look at the card and the layers as it opens.
This card is for a dear friend who just had a baby girl (after 2 boys) - after I saw her darling girl monkey room I found this darling outfit and made some cute matching flower clips (she can never have enough!) and just HAD to make a monkey card using the retired Life's A Jungle stamp set ;-)  Now I just need to get it in the mail so she can enjoy it!
Now for some previously posted projects using the Kraft Borders.
I love that you can leave them as-is...
...or color them using inks...
Thanks for looking - don't forget to hop along to Haley's Blog!